The Secure Shell
Abstract
With the growing importance of computers and computer networks in particular, networking security has become a cruicial issue in the Internet today. This document is meant as an introduction to the various attacks, Internet users have to face. Furthermore, the authors explain the Secure Shell (ssh) tool in great detail, which is a good way to defend against the attacks known today.
Contents
1.1 Principle of the Internet
1.2 Eavesdropping passing traffic
1.3 Eavesdropping is even more dangerous than you think
1.4 Does this apply to our local network, too?
2 The “Secure Shell” (ssh)
2.1 Parts of ssh
2.2 Features ssh
3 Cryptophical background
3.1 Conventional encryption
3.2 Public key encryption
3.3 Digital Signatures
4 Technical issues of the ssh
4.1 The ssh protocol
4.2 The ssh protects in many ways
4.3 Keymanagement
5 Practical issues of the ssh
5.1 Compilation and Installation
5.2 Transparent ssh Usage
5.3 ssh-aware Usage
5.4 Sophisticated ssh Usage
5.4.1 The ssh-agent
5.4.2 Replacing rstart
5.4.3 Forwarding and Tunneling Connects
A Trouble Shooting
A.1 Connection closes down immediately after establishing
A.2 The $DISPLAY variable is set incorrectly
A.3 ssh through a Firewall
B List of files
B.1 System-wide files
B.2 User customizable files
C Other sources of information
1 Why do you need a “secure shell”?
It is amazing how much energy the Internet users dedicate to ignoring potential security threats. After two decades of TCP/IP based networking, one would assume that the dangers of transferring important or private data through the network are commonly known. Unfortunately, this is not true. The ordinary telnet or rlogin services are still very popular and commonly used to access Internet sites remotely, even though replacements have been available for years.
This paper describes the risks of using unprotected Internet services briefly and covers the Secure Shell (ssh) package, which protects your data from the attacks known today.
1.1 Principle of the Internet
The Internet is a world-wide network, consisting of approximately 300000 computers1. These computers are linked to each other via means of electronic communications such as ISDN lines, fibre optics, ATM, Ethernet — to name a few. Obviously, it is not possible to connect every computer to every other participant of the net directly. Instead, each of this machines is linked to at least one neighbour, usually several neighbours. So how is it possible, that a user of machine A can access machine B, even if there is no direct communication link to machine B?
The answer is simple: All participating Internet sites cooperate with each other. If machine A needs to reach machine B, it uses its link to the neighbour site and says: “Hey, I need this packet of data delivered to this machine, could you please pass it on?” The neighbour in turn, asks one of his neighbours, and so on…. After a while, the packet reaches a neighbour of machine B, who is able to deliver it to the final recipient. This process is called routing and is illustrated in figure 1.
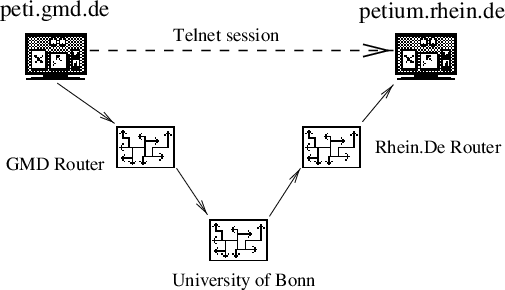
The figure shows the following case: A user on the machine “peti.gmd.de” uses “telnet” to connect to his home machine “petium.rhein.de”, which is connected via a dedicated serial line to the University of Bonn. For the user, all hosts between his and the remote machine are invisible. He or she types telnet petium.rhein.de and received an answer from the remote host. This is called an end-to-end connect. In fact, though, there are several other Internet hosts on the way to “petium”, which route the IP traffic in order to deliver it to the recipient.
With the traceroute utility, the exact path of the data can be displayed:
2 GMD-StAugustin.WiN-IP.DFN.DE (188.1.6.149)
3 ZR-Koeln1.WiN-IP.DFN.DE (188.1.6.145)
4 Uni-Bonn1.WiN-IP.DFN.DE (188.1.6.42)
5 kr-uni-bonn.Uni-Bonn.DE (188.1.6.46)
6 emil-1-f0.rhrz.uni-bonn.de (131.220.1.5)
7 131.220.241.2 (131.220.241.2)
8 watergate.informatik.uni-bonn.de (131.220.6.7)
9 gateless-gate.rhein.de (193.175.27.6)
10 gatekeeper.rhein.de (193.175.27.1)
11 petium.rhein.de (193.175.27.171)
In our example, a data packet travels through nine other computers, before it reaches its destination.
1.2 Eavesdropping passing traffic
What is the conclusion of the example shown in figure 1 ? The following “real-world” analogy should make it clear:
- Alice wants to tell Bob that she would like to see him this evening. She can’t reach him though, so she asks Carri, a colleague of her to try to reach Bob and to tell him her message.
- Carri meets her old friend Daniel and asks him, to tell Bob that Alice wants to meet him.
- Daniel passes this message to his colleague Egon, who works with Bob occasionally.
- Egon tells Bob that Alice would like to meet him.
Is this the way you’d like to communicate with someone?
Well, in the Internet you’re doing it all the time. Every single Internet site, that lies between the sender of some data packet and the addressee, is able to listen to every byte of data, that the two machines transfer.
Doing so is surprisingly easy. Most operating systems come with a small utility that displays or even logs all traffic that passes the machine, which is meant for debugging purposes — but not limited to debugging purposes. The most popular tool of this kind is tcpdump, but various other tools are available as commercial products or as freeware.
And in case you need more sophisticated network sniffing utilities, you can easily write your own. Just grab a copy of “Internetworking with TCP/IP” by Douglas E. Comer, take a look at the “Berkeley Packet Filter” device in your BSD Unix and there you go. With a bit of an effort, you can easily log all passing traffic that contains telnet data, electronic mail or any other Internet service.
1.3 Eavesdropping is even more dangerous than you think
The most obvious consequence of eavesdropping is that a hacker can see your e-mail, he can see what commands you are executing on the remote machine and so on.
What he can also see is your login name and your password.
This means, that he will be able to log into the machine using your account and access all your files. If you were unfortunate enough to become super user via su during an eavesdropped telnet session, he will also have super-user’-privileges and be able to access all files, even those of the other users.
A hacker with super-user-access to a machine can also install a copy of his sniffing software and eavesdrop the sessions that pass this machine, additionally to the ones that pass his own machine, resulting in even more information about accounts and user data. The damage is becomming worse exponentially. The more Internet sites a hacker controls, the more chances he has to observe passing IP traffic.
1.4 Does this apply to our local network, too?
Most organizations and companies have secured their internal network with an IP filter or a firewall software, to block incoming data. Thus, one would assume that “telnet” and other “remote access” services can be securely used if the session doesn’t leave the internal network, because no hacker will be able to access the data from the outside.
This is basically true, but there are a number of risks that remain. For one, experience has shown that virtually no firewall blocks all incoming traffic. For the convenience of the employees and customers, certain machines may pass the firewall and reach the inner network. May it be for administrative purposes, or to be able to read one’s electronic mail from the private machine.
If this is true, a hacker has various means of breaking into the inner network. He may eavesdrop a session from an employee, logging into his machine at work to read his e-mail. Now he knows the user’s login and password. Then he fakes the IP address and hostname of his machine and pretends to be the computer of the employee, which may pass the firewall, and logs in. While this attack is not very easy to accomplish, it is perfectly possible2.
Once the hacker is in the “secure internal network”, all doors are open. He may eavesdrop internal traffic, he can take advantage of the commonly used .rhost and /etc/hosts.equiv mechanisms to access even more machines.
Securing the internal network by a firewall and then leaving all internal communication unprotected can be compared to a bank that locks its front door, but leaves its customer’s money laying around on the desks.
In security issues, you are only as strong, as your weakest link.
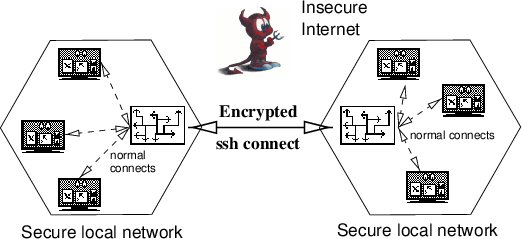
2 The “Secure Shell” (ssh)
Secure Shell is a program to log into another computer over a network, to execute commands in a remote machine, and to move files from one machine to another. It provides strong authentication and secure communication over insecure channels. It is designed to replace the rlogin. rsh and rcp commands. It never trusts the network, and if working with ssh, the whole communication is encrypted, passwords never walk unencrypted through the network. Rthe only transport protocol supported by ssh is TCP/IP.
2.1 Parts of ssh
ssh contains of three parts, a server part, a client part and a part for the user key management.
- Server Part
One single program, the sshd is used. sshd normally installed by root, is started at boot time. The sshd generates regularly new server keys, listening on port 22 (the ssh port) for incoming connections and handles the ssh-protocol due to his configuration in the sshd_config file.
- Client Part
The client part exports ssh, slogin and scp, which are build to replace rsh rlogin and rcp. There are additional parameters to the old ’r’-commands, see the man pages. The most useful option is -v, the verbose mode. Using this option, you can follow the protocol and get information about wrong configurations.
- User key management
Three commands for user key management are available:
-
ssh-keygen
generates a RSA key
-
ssh-agent
holds user keys in memory
-
ssh-add
adds the private part of the users key to the ssh-agent.
-
ssh-keygen
2.2 Features ssh
- Strong host authentication. Using public key rings of trusted (known) hosts the client is able to verify the server. Host keys are typically 1024 bits.
- Encryption of the whole communication. Using ssh the prompt for your password comes encrypted over the network, your answer is encrypted, too. Key exchange is done with RSA, the session is encrypted with a cipher, typically IDEA.
- X11 connection forwarding using fake proxies and cookies. $DISPLAY is automatically set on the server, forwarding any X11 connections over the secure channel.
- Tunneling (redirect arbitrary TCP/IP connections bi-directional over the encrypted channel) useful for rdist or backup via network
- User authentication using user RSA keys and/or standard authentication methods (.rhosts, passwd). User RSA keys should be at least 1024 bits, and are stored in the users private area.
- Server key regeneration. The server regenerates its RSA key (recommended 768 bits) automatically and never saves it in a file.
- Authentication agents. They can hold the users RSA keys, there is no need to store the keys anywhere else. All connections will be forwarded to the authenication agent.
- rsh fallback. ssh replaces the ’r’-commands, trying to open every connection via the ssh port. If the server does not support ssh, the old commands are used. A warning is displayed and the connection is continued insecure.
- Compression. All data, including forwarded X11 and TCP/IP tunnels, optionally can be compressed.
- Customizable. The client has customizable configuration files, system-wide and per user. ssh can be installed without root access. The server has to use a port number greater 1024.
3 Cryptophical background
Before discussing the ssh’s protocol in detail, a number of cryptographic concepts has to be explained, because knowledge of the fundamental cryptography is essential for understanding how the ssh works and why it is secure against most attacks known today.
3.1 Conventional encryption
Conventional encryption is almost as old as mankind itself. The idea is that a text is scrambled and unscrambled, using a certain algorithm and a specific key, for example, as password. The password modifies the way the characters or blocks of characters are substituted, rotated or whatever method the algorithm uses.
Encryption and decryption have to be done with the same key, or the original message will not be recovered. Conventional encryption is very strong and algorithms like Triple DES or IDEA can not be broken today. The disadvantage is, though, that the sender and recipient have to agree on a key before they can communicate securely. Hence, they need a secure channel to exchange the key, because the key can obviously not be sent over a channel where attackers might be listening.
For the sake of accuracy, we will describe the process as a mathematical function: Given an algorithm f, a message m and a key k, an enciphered message is computed as follows:

The original message can be recovered by computing

Examples for conventional, or symmetric encryption algorithms, that are commonly regarded as secure, are the Digital Encryption Standards (DES) or the International Data Encryption Algorithm (IDEA).
3.2 Public key encryption
Public key encryption, also called asymmetric encryption has been discovered in 1976 by Martin Hellman and Whitfield Diffie, and independently by Ralph Merkle. Public key encryption uses not one, but two keys to perform encryption and decryption.
The whole thing works as follows: Each side of the encrypted communications generates a key pair. These two keys are related to each other in a certain mathematical way, which varies, depending on the algorithm deployed. The idea is, that one key decrypts what the other key has encrypted before and vice versa, as shown in figure 2 .
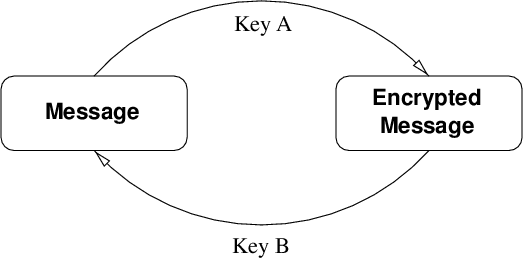
Now you label one of the keys public key and the other one secret key. The public key can be distributed openly. You can upload it to a keyserver, publish it in a newspaper or use any other means that deem appropriate. Now let us assume that Alice wants to send a private message to Bob, which should be encrypted.
So what she does is, she gets a copy of Bob’s public key and uses it to encrypt the text (figure 3).
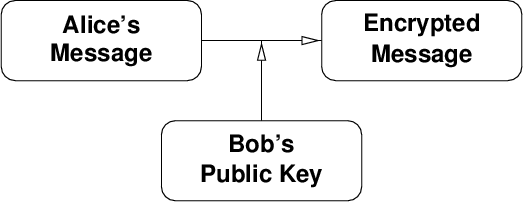
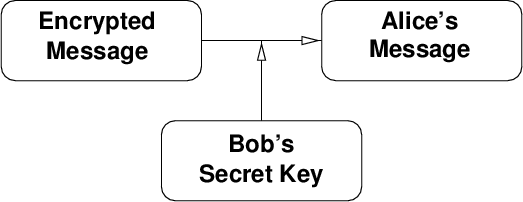
Then Alice sends the encrypted message to Bob. Bob uses his private key to decrypt the message (figure 4 ). Please note that Bob does not need Alice’s public to read the message, his secret key is sufficient. He will need Alice’s public key, though, in case he wants to send her an encrypted reply.
What is especially useful about this scheme is, that there’s is no need to exchange any key or password over a secure channel. Any attacker is helpless unless he is able to obtain the secret key of the receiver somehow – what should be avoided. Hence the name “secret” key.
For the mathematically oriented reader, here is the process described as an encryption function: If the two keys are called a and b, then encryption is performed by calculating

and decryption is done by calculating

This process works also vice versa:


A well known algorithm for public key encryption is RSA, which is named after its three inventors: Ron Rivest, Adi Shamir and Leonard Adleman. RSA uses primes to archive the public key effect and works as follows:
- Choose two primes p and q. In todays real life applications, these primes should be at least 512 bit long.
- Calculate N = pq. This value N is called the modulus of RSA. When both p and q are 512 bits long, N will be 1024 bit long. These 1024 bits are commonly referred to as the key length or modulus length.
- Calculate m = (p - 1)(q - 1).
- Choose your encryptor E. Usually E has the value 216 + 1, but RSA will work with any E you will choose.
- Now you have to find a number
d which is relatively prime to E and m, what means that it
fulfills this equation: Edmodm = 1.
With a chosen E, you can calculate d using the extended Euclidean algorithm, which will not be described here but can be found in the mathematical literature.
- Now your public key consists of E and N, while your secret key consists of d and N.
Once you have your key generated, you can encrypt a message with someone’s public key as follows: m′ = mE modN. m can be any numerical representation of the message you want to encrypt. For encrypting texts, the ASCII code is well suited for this purpose.
The recipient of the encrypted message m′ can now recover the plain text by calculating: m = m′d modN.
Encryption and decryption work in both ways. What is encrypted with E will be decrypted with d and vice versa. It is just a convention that the encryptor is E.
The big advantage of this encryption scheme is, that you can openly distribute your public key E and N. You could upload these two numbers to a public key server and everybody could obtain them and use the key to encrypt a message. Only the person who knows d is able to recover the plain text. Even though you’re distributing your key through insecure channels, the encrypted message for you is secure as long as nobody is able to steal your secret key d.
Obviously, this system can be attacked quite easily. An attacker knows E and N, so all he has to do is to factorize N for p and q. Then he can calculate m, quickly find your d and read your encrypted mail.
The problem is just, that no algorithm to factor N efficiently is known today. Generating the large prime numbers p and q is very easy, calculating with them is something every personal computer is capable of. But going the other way of finding a certain pair of p and q when only their product is known, is virtually impossible.
A modern PC can do all required calculations to generate a 2048 bit key in very short time. But factoring this 2048 bit number is way beyond the scope of what can be done. Not only would the calculations require dozens of centuries, but memory is also an important factor. Using the most efficient number sieve known today, the factoring would result in a matrix with 10150 elements. Unfortunately, the Universe features only approximately 10100 atoms! Even if we could store a multi-digit number in a single atom, the calculation could not be done.
Cryptoanalysts have proposed numerous ways to crack RSA, including quantum computers and biological calculation machines, but none of these attacks looks likely within the next hundred years or beyond.
RSA, and public key encryption in general, does have a few disadvantages, though. First of all, the required calculations are very slow. Even using short cuts like the Chinese Remainder Theorem, Smith’s fast modulus and other algorithms, a Pentium 120 requires several seconds to en-/decrypt a message with a 1024 bit RSA key.
One trick to use RSA in reasonable time, though, is a hybrid system. That means that the actual message is encrypted using a conventional algorithm such as DES or IDEA. The key for the conventional algorithm is created randomly and is called a session key. Then this session key is encrypted with RSA and appended to the message. The advantage is that a session key is only, say, 128 bit long, depending on the used algorithm, while the actual message may be several kilobyte long.
Another disadvantage is that all RSA encrypted messages will fall once an efficient factoring algorithm is discovered. Rumor has it that the National Security Agency (NSA) is already able to crack RSA, but no evidence was ever shown. However, whether the NSA can factor large numbers or not, it is absolutely possible that such an algorithm will be discovered in the very near future.
Last but not least, it is not proven yet, that factoring N is the only way to crack RSA. There might well be a different attack, which is able to calculate d without having to factor N. It just has not been discovered yet.
3.3 Digital Signatures
Next to secrecy, authenticy is one of the prime goals of cryptography. A digital signature is a proof that a certain message was really written by Alice, for example. Furthermore, signatures usually guarantee that a message has not been tampered with. Using one-way hash functions and public key encryption, a signature can, for example, be issued as follows:
- Calculate a certain one-way function over the to-be-signed message (checksum).
- Encrypt this checksum using your secret key.
- Append the encrypted checksum to the document.
Now, anybody who knows the appropriate public key, is able to verify who wrote the document. Using the public key of, say, Alice, Bob is able to recover the checksum. Then he calculates the checksum, over the message he received and compares it with the checksum that was appended to the message. If the two checksums are identical, he knows for sure that the owner of the secret key, matching the public key he used, has created this signature.
4 Technical issues of the ssh
4.1 The ssh protocol
Establishing a host to host connection with ssh step by step:
- The client, who wants to establish a connetction, connects to the destination host, port 22.
- The server checks whether the connect comes from an authorized address and, if it does, responds with its version identification string.
- The client parses the string and sends his own version identification back.
- If either side fails to understand or to support the peer’s version, the connection is closed.
- The server now sends its RSA host- and server-key to the client. The RSA host key is generated once, when the ssh is installed and shouldn’t change. This key is 1024 bit large. The server-key is a 786 bit RSA key, which is generated during after startup of the sshd. This key is never stored on disk. The sshd will regularly erase it and generate a new server-key. Also included in the message are 64 bit of random data, a “cookie”, which the client must include in its reply to the server.
- The client creates a random session key for the chosen conventional cipher, usually IDEA. This session key is encrypted with both RSA keys of the server and the result is sent back to the server.
- Both sides switch to conventional encryption, using the exchanged session key.
- The client authenticiates itself using
the followings methods in the order we list them here:
- .rhosts or /etc/hosts.equiv
- RSA based host authenticiation
- RSA authenticiation
- password authenticiation
- If authenticiation is successful, the client makes a number of requests to prepare the session. This typically includes allocating a pseudo terminal, X11 forwarding, TCP forwarding (tunneling), authenticiation agent forwarding and executing a shell or a command.
- When a shell or a command is executed, the connection enters interactive session mode. In this mode, data is passed in both directions and usually displayed on the users terminal. The session ends when the server sends the exit status of the executed program to the client.
4.2 The ssh protects in many ways
Snooping or eavesdropping is ineffective because the whole session is encrypted. The server key changes regularly, session keys are unique. Even if someone records a whole session and later tries to “replay” it, the attack will fail. No-one can reproduce the server-key or the cookie. To get the information, the RSA key has to be broken.
DNS-spoofing and man-in-the-middle attacks are prevented by using RSA host keys and keyrings of trusted hosts. ssh never trusts the network, with RSA authentication nothing but the own private key is trusted.
The security of X11 Sessions is increased. Using X11 forwarding, your session is encrypted. An other point of security using X11 is the use of displays or Xterminals. Most of us did this wrong before. If the $DISPLAY-variable is incorrect, the required application opens anywhere, but not on the monitor the command was started from. Often the console monitor at the server shows such mistakes. A spy would use this feature to snoop the X-session.
X11 forwarding establishes a fake X-server on the server, which handles the connection between ssh and sshd. If you open an xterm on a remote server, sshd forks a fake X-server on the remote server, set the $DISPLAY-variable to, say ”petium:1”. xterm sends all X information to this server on its own host. The fake sshd-X-Server encrypts the information and sends it to the ssh client on the local machine. The ssh client encrypts the information and sends it to the real X-Server, which displays it.
The real X-Server on the local machine is communicating to the ssh client on the local machine and not the xterm on “petium”, in much the same ways as the xterm on “petium” is communicating with the fake sshd-X-Server on “petium”.
Because the old authentication methods are supported and can be combined with new, more secure methods, user can work with ssh without conversion. There is no need to change ”point-files” or scripts.
ssh does not protect against inadmissible root access on server or client host. If someone has access to the private RSA keys, authentication becomes insecure.
4.3 Keymanagement
The RSA keys of trusted hosts (“host keys”) are stored in the file /etc/ssh_known_hosts on each server- and client-machine. The security of the ssh_known_hosts file is very important to the security of the whole ssh. This file should be maintained carefully.
Only public key should be inserted, that have been exchanged over a secure channel, for example via PGP-encrypted e-mail. This is a job for the network administrator. He also distributes the updated pubkeyring onto the machines runnung sshd. Clients can get the actual version of the keyring from one of the server. The user can build his own ring of trusted hosts in his home directory.
Besides the RSA keys to authenticiate hosts, the ssh also supports RSA key pairs for users of a machine, which are used to authenticiate the user. A user creates a key pair of his own by executing ssh-keygen. The generated keys are stored in his home directory. To protect the secret part against access by the super-user, the file is stored in encrypted fasion, using a password as chosen by the user. The user will be prompted for this password, every time the ssh needs to access his private key.
Authenticiation using the user RSA keys works as follows:
- The client tells the server that he wants to log into the remote machine as user “joe”.
- The server checks whether a user of this name exists and whether a .rhosts or /etc/hosts.equiv file permits login from the client’s machine.
- If not, the server checks whether a public key for the user on the client’s machine is found in $HOME/.ssh/authorized_keys. If a key exists, the server wil create a random series of byte, called a challenge, and encrypt it with this key. The encrypted challenge is sent to the client. The client has to decrypt the challenge and return the correct MD5 checksum of the random data, to prove that he owns the matching secret key. Of this is performed successfully, the authenticiation is complete.
- If no public key for the user at the client’s host is known, the normal password mechanism will be used to authenticiate the user.
5 Practical issues of the ssh
The third part of this paper deals with the practical issues of using the Secure Shell and is meant as a guide to the ssh for the Unix user. The authors differentiate between three levels of usage: The transparant or ssh-unaware usage, the ssh-aware usage and the sophisticated ssh usage, which includes the more complex features such as tunnelling and the ssh-agent.
5.1 Compilation and Installation
After obtaining a copy of the latest ssh version, the system administrator will have to compile and install the binaries. This process is explained in great detail in the included README and INSTALL files and won’t be covered here. The authors would like to give a few recommendations, though, what points of the this process deserve some attention.
- You should add support for the libwrap.a library, which comes with the TCP wrapper tcpd. This will enable you to block certain addresses, domains or other entinities from accessing the ssh at your site at all. The technical details are descibed in the INSTALL document in the paragraph “Libwrap and identd”.
- The ssh should be installed as a drop-in replacement for the ordinary rsh and rlogin programs. The technical details are descibed in the INSTALL document in the paragraph “Replacing rlogin and rsh”.
5.2 Transparent ssh Usage
If, and only if, the system administrator has installed the ssh binaries as a drop-in replacement for the ordinary rsh and rlogin programs, all users will benefit from ssh’s security features even if they’re unaware that the ssh is installed at all.
When installing the ssh to replace the original commands, the ssh will act the same way the old remote-commands did. .rhosts or /etc/hosts.equiv authenticiation will be used to determine, who is allowed to access a machine and who is not. If an access attempt is not authenticiated through the “rhosts”-meachnism, the user will be prompted for his login password.
Even though the user is not aware of the new features, he gains a lot of security. The ssh-version of rlogin will establish an encrypted session to the target machine and protect all transferred data. It will also tunnel the X11 traffic and set the $DISPLAY variable if X11-support has been compiled in.
Thanks to the RSA host authenticiation system deployed by the ssh, it is not possible to fake domain name server entries and to take advantage of the rhosts-mechanism anymore, because a host is not recognized via his DNS name, but through his host key.
The man-in-the-middle attack has also become inpossible, because the client does of course check the identity of the remote host using his host key, too. To archieve maximum security here, the client should be configured to use “StrictHostKeyChecking”. Setting this option to “yes” tells the client not to accept any new or modified hostkey as real. If a new host has been added to the network, or a host key has been changed, the administrator has to install the new key manually. While this is a bit inconvenient in a fast moving network, it ensure that nobody intercepts your IP packets and claims to be the machine you tried to access.
The only danger left is the user authenticiation during the login process. An attack is feasible in the following Scenario: Bob is a legitimate user on the machines “peti.gmd.de” and “petium.rhein.de”. His username is “bob”. Alice owns a legitimate account as “alice” on “peti.gmd.de”, but does not have access to “petium.rhein.de”.
Bob regularly logs into “petium.rhein.de” and thus has the following entry in his local .rhosts file:
If Alice is able to fool the login process on “petium.rhein.de” into thinking that her username on “peti.gmd.de” is “bob” instead of “alice”, she is able to log into Bob’s account on “petium.rhein.de”. This can, for example, be archieved with a modified rlogin program or by tempering with the identd daemon on “peti.gmd.de”.
To make matters worse, once she managed to log into “petium.rhein.de” as “bob”, she can log back into “peti.gmd.de” as “bob”, too, if Bob has a similar .rhosts file on “peti.gmd.de”, too.
This attack is admittedly not easy to perform because modifying identd or rlogin will require super-user priviledes.
Another weakness remains: Even when installing the ssh as drop-in replacement, the rcp command will not be replaced. If a user wants to copy a file from one host to another securely, he has to use scp instead. If the user is not aware of the Secure Shell, though, he will use rcp instead and thus transfer the file unencryptedly.
As a conclusion we will draw, that this level of protection by the ssh is pretty satisfactory. The daily procedures, cron jobs and script, which rely on the BSD-style remote commands will continue to function as usual, but offer much more protection against eavesdropping or other attacks. Except for copying a file to a remote host, all other transfers are encrypted and no password can be eavesdropped.
5.3 ssh-aware Usage
For explicit using ssh exports the following commands:
ssh is the replacement for rsh and rlogin, slogin is linked on ssh. One can always use ssh instead of rsh or rlogin, even if the other side runs no sshd. In this case the fallback to rsh is used. ssh has couple of optional parameters, refer to the manpages.
Some examples:
$ ssh remotehost command (--> rsh remotehost command)
$ xterm -e ssh remotehost &
scp is the replacement for rcp. It uses ssh for data transfer and will ask the user for authenication (password or passphrase) if needed. The data can be compressed with gzip. scp has to be called explicitly, it does not replace rcp.
To use your own RSA keys for authentication, you have to generate your RSA key pair with ssh-keygen. It will ask you for a passphrase. This passphrase is used to encrypt your secret RSA key via a conventional cipher, usually IDEA, before it is stored in your local home directory as $HOME/.ssh/identity. It it strongly recommended to use passphrases for RSA keys. If the home directory is exported via NFS, your secret key would otherwise be readable in the clear. Protecting your private keys against unauthorized access, is the most important thing you have to obey.
5.4 Sophisticated ssh Usage
The ssh has numerous features and capabilities that may prove useful in all kind of network-related work. Some of them offer completely new functionality, some of the features are just meant to increase the security and convenience of using the ssh even more.
5.4.1 The ssh-agent
The problem with authenticiation via the .rhosts mechanism is, that a hacker might be able to fake his user name on a trusted machine and log into the remote machine as someone else. While this is difficult to accomplish, it is very easy to do for someone who has super-user priviledes.
The ssh thus offers a better way to authenticiate the user: The user RSA keys challenge3, which has been described in the section about the ssh’s protocol. For this scheme to be sure against super-user attacks, though, the secret key has to be stored on the harddisk in encrypted fashion. Hence, the user has to provide a password which decrypts the key, before it can be used.
But many user find entering a password every time the use a remote machine annoying – that is why they used the .rhosts mechanism after all. That is why the ssh-agent was introduced. The ssh-agent is run once, after the user has logged into his local machine, and will then run until the user logs off. This agent is a background daemon, which can maintain the user’s secret keys in memory — unencrypted. The process works as follows:
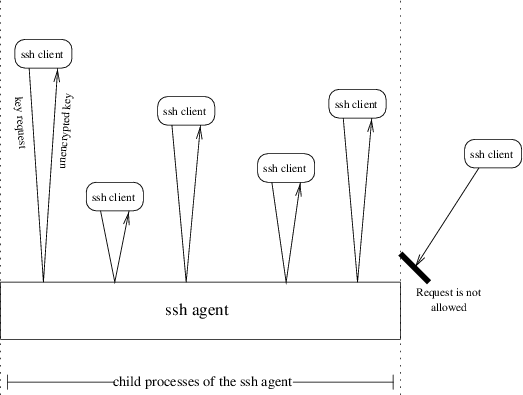
The ssh-agent is started. It install itself in the background and then executes a command as specified on the command line. Usually this is a shell or an X server. This command, and all processes it may create are “children” of the agent. If one uses the following call, for example:
the csh would be invoked as a child of the ssh-agent, as would all commands started by the csh.
These childen now, can access the ssh-agent and ask for a RSA user secret key. If the user would start a remote login session via ssh in the csh started in the example above, the ssh will connect to the ssh-agent and query it for the user’s secret key in order to use this key for authenticiation purposes.
All processes that are not invoked as children of the ssh-agent can not query the daemon, hence it is not possible for another user to obtain a copy of the secret key via the ssh-agent. Once the daemon is up and running, the user will be able to log into other machines securely, without having to provide any kind of password and without using any .rhosts files on the remote hosts. This is the most comfortable and the most secure way to use the ssh.
One point is still missing in our description, though: How does the ssh-agent get the secret key? The key is stored encryptedly on the harddisk, so the daemon can not simply read it.
This is indeed true. The user has to add his secret key manually once. While doing this, he will be prompted for the password to unlock the encrypted file on disk, and from then on the key will be available via the ssh-agent. This is done with the ssh-add program, included in the distribution.
Obviously, the timing of starting the ssh-agent after login is important, because ideally all started user processes should be children of the daemon, to enable them to access the key if necessary. Integrating the ssh-agent into a running system can be tricky and should be done by the system administrator.
We will provide two example, how the ssh-agent can be transparently integrated into a system. Machines running the tool xdm, can add the startup of ssh-agent to the script /usr/X11R6/lib/X11/xdm/Xsession. This script is called immediately after the login succeeded and starts the X11 environment up:
startup=$HOME/.xinitrc
resources=$HOME/.Xdefaults
if [ -f "$startup" ]; then
exec /usr/local/bin/ssh-agent "$startup"
else
if [ -f "$resources" ]; then
xrdb -load "$resources"
fi
exec /usr/local/bin/ssh-agent xsm
fi
The call to ssh-add should then be placed in the script $HOME/.xinitrc by the user. Here is an example, how this script may look:
ssh-add </dev/null
xrdb -load $HOME/.Xdefaults
xterm &
fvwm2
The user will see the following: xdm prompts him for his user name and login password. Immediately after he entered both, a second login window will appear and ask him for the password to unlock his ssh-secret-key. From then all, he won’t have to enter the password again, as all processes will be able to query the ssh-agent for the key.
Integrating the ssh-agent info cde is very similar. Just add the call to the script /usr/dt/bin/Xsession. Here’s is an example:
# Session startup clients and args
#
if [ "$SESSIONTYPE" = "altDt" ]; then
dtstart_session[0]="$SDT_ALT_SESSION"
dtstart_hello[0]="$SDT_ALT_HELLO"
else
if [ -d $HOME/.ssh ]; then
dtstart_session[0]="/opt/local/bin/ssh-agent $DT_BINPATH/dtsession"
dtstart_hello[0]="$DT_BINPATH/dthello &"
else
dtstart_session[0]="$DT_BINPATH/dtsession"
dtstart_hello[0]="$DT_BINPATH/dthello &"
fi
fi
The use of ssh-agent and RSA authenticiation is highly recommended over the .rhosts authenticiation scheme.
5.4.2 Replacing rstart
rstart is a small utility that comes with X11 and can be used to start an X11 application remotely. rstart does pretty much the same as rsh, but is X11-aware. That means, that the display of the remotely started program will appear on the screen you’re working at the moment.
The ssh offers two switches, ’-n’ and ’-f’, which can be used to accomplish the same effect in a secure way. The ’-n’ option tells the ssh client to redirect the standard input stream to /dev/null, to enable running the client in the background. Using this switch, one can replace rstart:
$ ssh -n mogli.gmd.de xlogo &
Both commands have the same effect.
The problem one may face using this method, though, is that the client may need the standard input stream to prompt for an authenticiation password. This will cause the process to be stopped by the operating system, because it fails to access the terminal. While rstart offers no solution to this problem, the ssh features the ’-f’ switch.
When ’-f’ is provided on the command line, the ssh client will go into background after the login has succeeded. The following command line, for example:
performs the following steps:
- Log into the remote machine “mogli.gmd.de”.
- If required, prompt the user for the password.
- Redirect the standard input stream to /dev/null.
- Start the program on the remote host and forward the X11 display via an encrypted channel to the local screen.
- Lay the ssh process in the background and return to the shell.
5.4.3 Forwarding and Tunneling Connects
Even though logging into remote machines and executing commands remotely is secure now, there still remain numberous widely deployed services that transfer sensible data through the Internet in unsecured fashion, for example the electronic mail service SMTP, electronic mail retrieval with POP3, password authenticiation over HTTP and many more.
Some of these services can be tunneled through a secure ssh connection. The principle is as shown in figure 6 .
We will demonstrate the implementation of this scheme by an example. Let us assume that Users of the GMD regularly have to ftp files from “phoenix.rhein.de”. This machine is connected via Ethernet to the already mentioned “petium.rhein.de”, so connects between “phoenix” and “petium” are assumed to be secure. The same applies to connects within the GMD’s local network, which is protected by a firewall.
The super-user on “peti.gmd.de” now executes the commands4:
$ ssh -a -f -L 20:phoenix.rhein.de:20 petium.rhein.de xlogo
These two commands perform the following actions:
- ssh allocates the local TCP port 21, respectively 20.
- ssh logs into “petium.rhein.de”, prompting the user for a password if necessary.
- Onces the login suceeded, the ssh opens a tunnel to “phoenix.rhein.de”, port 21 or port 20 respectively.
- The program xlogo is started on “petium.rhein.de” and the display will appear on the local screen.
- Once the remote command has been executed, the ssh will place itself in the background and return to the shell.
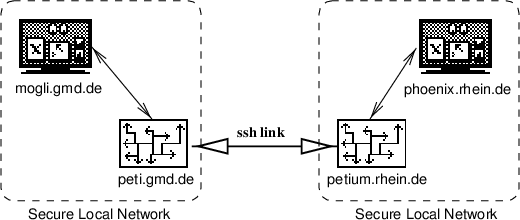
The tunnel is now established. Assuming, a user on the machine “mogli.gmd.de” would connect to “peti.gmd.de”, port 21, the ssh-client started before would accept it and forward the connect through the established ssh link to “petium.rhein.de”. “petium” then forwards the connect to “phoenix.rhein.de”, port 21 — as has been specified on the command line. This process is illustrated in figure 7.
The connect from “mogli.gmd.de” has ultimately been forwarded to “phoenix.rhein.de” and even though, the file transfer protocol (FTP) does not support any kind of encryption, the whole communication is secured by the ssh. Neither the login phase nor the actual data transfer are visible in the Internet.
A nice side-effect of the tunnel feature is, that it is possible to securely reach machines that do not even support the ssh themselves. In our example, “phoenix.rhein.de” could be a simple file server and still the tunnel would work. If “phoenix” does support the ssh, though, it would have been better to log directly into “phoenix.rhein.de” and to “tunnel” the connect only on the local machine. By doing this, the user doesn’t even have to trust the local network.
The command line parameter we used, ’-L’ opens the one end of the tunnel on the local machine and opens the other end at the specified host and port. Another possibility is to use ’-R’ instead, which opens the tunnel not on the local machine, but asks the remote machine to open the tunnel. Either ’-L’ or ’-R’ is fine and chosing one way or the other is just a matter of personal taste.
A Trouble Shooting
A.1 Connection closes down immediately after establishing
Try again, using ’-v’ option. You will get a lot of information about what’s done. Often a world/group writable home directory or .rhosts file causes the error.
If the servers host key is not in your systems keyring (/etc/ssh_known_hosts), put into your local $HOME/.ssh/known_hosts file and ask your system administrator to include it in the global file.
A.2 The $DISPLAY variable is set incorrectly
Using ssh, you should never set $DISPLAY from your own. The following lines can be placed in different ”point-files”, e.g .login or .cshrc.local:
then
setenv DISPLAY ‘hostname‘:0
endif
Using .login, this could look something like this:
set REMHOST=‘who | awk ’$2=="’"$TTY"’" {print $NF}’‘
set DISPLAY_HOST=‘expr X"$REMHOST" : X’(\(.*\):’ ’
|’ X"$REMHOST" : X’(\(.*\))’ ’
|’ UNKNOWN‘
if (!($?DISPLAY)) then
if ($DISPLAY_HOST != "UNKNOWN") then
setenv DISPLAY "$DISPLAY_HOST":0
else
setenv DISPLAY ‘hostname‘:0
endif
endif
A.3 ssh through a Firewall
The firewall has to allow connections between the hosts on port 22. If the .rhosts mechanism is deployed for user authentication, the backchannel will be allocated on a port below 1024. Some firewalls do not allow incoming connects on ports below 1024, though, and the ssh login will fail. This can be fixed by adding the following lines to $HOME/.ssh/config
RhostsAuthentication no
RhostsRSAAuthentication no
B List of files
The various files used by the ssh can be confusing for the beginner. To give the reader an overview and a reference list, we will list all files here, with a short description of their purpose.
B.1 System-wide files
All these files reside in the /etc directory.
- /etc/ssh_host_key
- This file contains the hosts private RSA key and should be accessible only by the super-user. The key is generated during the installation of the sshd.
- /etc/ssh_host_key.pub
- This is the hosts public RSA key, which is generated during the installation. This file should be world-readable.
- /etc/ssh_random-seed
- This file contains the seed for the random number generator and is generated and maintained by the ssh automatically. The seed should only be accessible by the super-user.
- /etc/ssh_known_hosts
- The “keyring” of public host-keys for other systems. This file should be maintained by the system administrator and all keys included here should be checked carefully for their authenticity. This file should be world-readable, but only writable for the super-user.
- /etc/sshd_config
-
Configuration file for sshd. Please refer to
the sshd(8) man page for a description of all
supported options. This file should be world-readable, but only writable
for the super-user. The authors recommend the following settings to be
included:
ServerKeyBits 1024
KeyRegenerationInterval 18000
PermitRootLogin no
IgnoreRhosts yes
StrictModes yes
RhostsAuthentication no
RhostsRSAAuthentication yes
RSAAuthentication yes
PasswordAuthentication yes
PermitEmptyPasswords no - /etc/ssh_config
-
The system wide configuration file for ssh
client. Provides defaults for parameters not set in the user file
$HOME/.ssh/config. Please refer to the
ssh(1) man page for a description of all
supported options. This file should be world-readable, but only writable
for the super-user. The authors recommend the following settings to be
included:
ForwardAgent yes
ForwardX11 yes
RhostsAuthentication no
RhostsRSAAuthentication no
RSAAuthentication yes
PasswordAuthentication yes
FallBackToRsh yes
UseRsh no
StrictHostKeyChecking yes - /etc/shosts.equiv
- Same file as the system’s /etc/hosts.equiv, but only read by the ssh. Usage of this file is discouraged by the authors.
- /etc/sshrc
- Commands to execute after successful login and before starting the user’s shell
B.2 User customizable files
All these files reside in the user’s home directory.
- $HOME/.rhosts
- This file contains a list of trusted hosts and user names, which are allowed to log in without authenticiation. The use of this mechanism is discouraged by the authors.
- $HOME/.shosts
- Same purpose as the $HOME/.rhosts file, but only read by the ssh. Usage of this file is discouraged by the authors.
- $HOME/.ssh/known_hosts
- The users own public host keyring. If StrictHostKeyChecking is enabled, this file is ignored, otherwise it is used in conjunction with the global file /etc/ssh_known_hosts.
- $HOME/.ssh/authorized_keys
- A list of public user RSA public keys. Using these keys, a user can log into the system via a RSA challenge.
- $HOME/.ssh/identity
- The user’s private RSA key for this machine. This file should be accessable only by the user.
- $HOME/.ssh/identity.pub
- The user’s public RSA key for this machine. The key should be in the authorized_key file on the remote hosts, to replace the functionality of .rhosts when using RSA authentication.
- $HOME/.ssh/random_seed
- This file contains the user’s seed for the random number generator and is generated and maintained by the ssh automatically. The file should only be accessible by the user.
- $HOME/.ssh/config
- The user’s own confguration file for the ssh client. Used in combination with /etc/ssh_config.
- $HOME/.ssh/environment
- List of environment variables to set for this user at login.
- $HOME/.ssh/rc
- Same functionality as /etc/sshrc, but forthe individual user.
C Other sources of information
The interested reader will find more information about the ssh in the various man pages and, of course, in the Internet. The following list is a collection of URLs, which are recommended by the authors.
- http://www.cs.hut.fi/ssh/
- The official “Secure Shell Home Page”. This page has several interesting documents, links to other sites and always the latest versions of the ssh for the various operating systems.
- http://www.datafellows.com/f-secure/
- The company “Datafellows” maintains the commercial branch of the ssh, mainly the Windows versions.
- http://www.uni-karlsruhe.de/ ig25/ssh-faq/
- The “Secure Shell Frequently Asked Questions” are maintained by Thomas König and cover many problems a user or administrator might face while using the ssh.
- http://www.cs.hut.fi/ssh/ssh-archive/
- Another source of information is the ssh user mailing list. Under this URL, all posted articles have been made available.
- http://www.gmd.de/intern/WTI/iT/ssh-announce.html
-
Georg Wittig has written a small text in German, meant for the GMD employees. The text describes the features and purpose of the ssh in way less words than this document does.
- http://www1.tu-chemnitz.de/ hot/ssh/ssh.html
-
Holger Trapp is the author of the document “Gesicherte Kommunikation über unsichere Netze”, which is a brief description of the ssh for the practical user, in German language.
- http://lists.w3.org/Archives/Public/ietf-tls/msg00555.html
-
This is the official description of the protocol used by the ssh, published as an official Internet draft by Tatu Ylonen <ylo@ssh.fi>.
- http://www.cert.dfn.de/infoserv/dib/dib-9601.html
- Here the reader will find an “Informationsbulletin SSH” in German language, published by the DFN-CERT organization.